Friday, September 24, 2010

What I've been up to...

I haven't fallen off the face of blogland. Life had the nerve to get in the way! :)
This little guy has been really sick since last Friday. His fever finally broke today, so I am hoping we are on the upswing. He is not a fun sick kid. Lots of crying, whining and holding. The good part is the cuddling. He is only cuddly when sick, so I'll take what I can get! :)
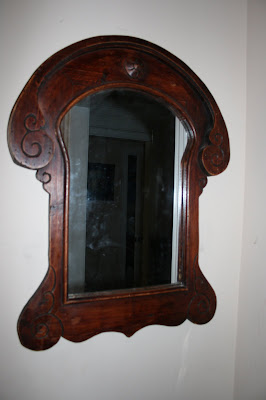
This is one of my favorite finds lately! I got this at a yard sale for two bucks! It is kind of funky, but so am I. The lady told me they got it when they were stationed in Japan and that it just didn't go with their decor anymore. I came home and took down my plain framed mirror and smile every time I pass it!
I haven't cleaned it yet (and you can tell in these pictures) but I love the details!
There is a small crack in the mirror (you can see it to the right of the flash), but I think it just adds to the charm. I am so glad I didn't pass this up! I almost did b/c it was tucked up under the table and wasn't looking spectacular!

In addition to tending to my sick little guy this week, I have been busy getting caught up on orders for my business. My partner and I have a great system down. She cuts the wood, paints and distresses it. I do all the vinyl work and final finish then deliver the goods.
We are vendors in 2 local stores and here are a few of the orders we had due this week:

This is one of the favorites for scrapbook rooms!
Grandparents boards are a twist on the family boards. This is a new design and is already quite popular. I am thinking my inlaws will be getting one for Christmas


This is another grandparents board.

This is the traditional board that inspired the grandparents board.

And for fun, a little pink sign! I did an undercoating of chocolate brown paint, and where I sanded the brown comes through. I don't think you can really see it in the picture, but it looks neat!
That is just a sampling of what we have been up to this week! I am looking forward to getting to play in the garage tomorrow! I have a dresser transformation that I can not wait to finish up and get posted! Also a 5 dollar side table! I need to get a basket for it tomorrow! I'll be back Saturday evening or Sunday with some real project posts!

Monday, September 13, 2010

For the birds....

I forgot to take a picture of the frame before. I just primed, then sprayed an old ugly frame from which the glass was broken. Since this was for a baby girl, I did the light pink I used on a previous project.
After the pink was dry, I glazed it. You know I love that stuff! :)

This little bird will be in the center. I simply modpodged the paper onto the mdf birdie. Sand around the bird to tear away the excess paper and get a smooth edge.
I was trying to decide where to go from here. My original plan was to mount the modpodged bird onto some covered chipboard.
Instead, I drilled a hole in the bird.
Selected some pretty ribbon and tied it onto the frame. I didn't want the bird to slide around a ton, so I used a staple gun and stapled the ribbon to the frame on the back.
Here it is hanging on my wall. I think it turned out kind of cute and I like the depth it has hanging there vs. being mounted on chipboard.

Wouldn't an initial look cute like this too!
This project cost nothing since I had everything on hand. I would expect it would cost you less than $3.00 to make if you had to buy it all.
The past week has been unbelievable crazy, but things have settled back down and I have a TON of great stuff up the shoot! A few side tables, a dining room table, the dresser I have been putting off forever, and much more! Plus, I am getting ready for our fall show season, so I'll be sharing some new designs we are working on for our vinyl signs!

Monday, September 6, 2010

The Force was with me!

This Saturday, my yard sale buddy and I sat out on yet another grand adventure. Luck (or the Force....) was with me this weekend! I have four boys. Three of which are still into all things Star Wars. One of the later sales we stopped at on Saturday was a guy selling off all his old childhood toys. He had a computer box marked $5.00 for the box. It was full of ORIGINAL Star Wars toys. Like from 1977. The "newest" one is marked 1980. He also was selling all his original GI Joe toys. I immediately took interest in the Star Wars toys b/c some of our storm troopers had recently died at the mouth of our dog. She loves to chew their heads off then leave them for dead.
We have not been buying the boys any toys b/c of the state of their rooms. I'll translate that for you: their rooms are F-5 tornado messy. Bad....But I just could not pass up this box of toys. The guys was pretty desperate to sell, and told me if I was interested he would bargain a little. I offered $3.00 and he accepted. I got all these goodies below for three bucks! I have been told the above is some kind of obscure medical ship. I don't remember ever seeing it, but I'll bow to the knowledge of my Star Wars nerds.
This toy still had the original R2D2 in it. The R2 was in rough shape, but still usable. The stickers are just very worn.

See what I mean. Poor R2 has seen better days. But hey, it is over 30 years old!

I have no idea what this is called. It looked brand spankin' new. I am guessing it wasn't a favorite.

This and the one below are small and metal, about the size of my hand.


An original lightsaber. Unfortunately it is just the handle. The saber portion has been long gone. My boys still thought it was cool!

Here is a 1977 Blue R2D2 (the other one that was in bad shape had the orange stickers)
I just love R2D2. I would have been thrilled if the loot included a C3PO.


Here is some more of the gang...I didn't realize that the original action figures heads were not movable.

And the whole gang together.

My boys were thrilled when they spotted the box and their new treasures. Their excitement was quickly dashed when they were informed the Star Wars contingency would only be moving upstairs when their room was clean. Today is Monday and they are still waiting to be moved to their new homes. My boys do come and visit the box regularly. But I am a mean mom and they don't get them till the room is clean.
My husband was even excited about this yard sale find. He actually said I should have bought the GI Joe stuff! It was a HUGE rubbermaid full of all the original guys, vehicles and accessories for 20 bucks. I remember my brother having all these toys back in the day! A bit of nostalgia and lots of future fun for my boys....and all for $3.00!

Friday, September 3, 2010

Recent thrifty finds

My favorite local thrift store has occasional sales where furniture is half off. I happened to stumble by one day not too long ago and grabbed this desk for $7.50. The drawers are falling apart, but I think this piece will be adorable when it is redone! I am tempted to forget about the drawers and make each opening a shelf. It most certainly needs a good cleaning, sanding and some paint!
Today, I was out running errands by myself and decided to pop in. I was actually looking for a large frame for a project for church, but never one to pass up a sale, ended up in the furniture depart because of the 1/2 priced sale. I was hoping to find a dresser, but there was nothing good left. On my way out, I spotted this desk from the corner of my eye.
The veneer has some peeling, there is some rust, and it needs lots of work. But it was marked $5.00, so for $2.50 it was going home with me!!!!
I love the thick tubing on the arm of the desk. Now to decide what colors and treatment to do!!
My little four year old thought this was the coolest thing! These are the kinds of desks we used when I was in school! I don't remember the actual desk top being so small though. Do you?

Wednesday, September 1, 2010

Two Faced.....it's a good thing! :)

I know it is only September, but I am already planning for the holidays! They'll be here before we know it! :)
This is a fun little project! All the supplies you need are listed below.
I started with the wood. I didn't even bother sanding it prior to painting b/c I knew I was going to do a really distressed finish on them.


The science behind my paint choice is an exact one....I had 2 nearly empty cans of spray paint. It was not enough to do a piece of furniture and I couldn't stand to throw it out. So...the entire piece was painted my favorite Krylon Blue.

This sign is going to be "two-faced" so it can be in use longer. I love seasonal decorations, but storage is a premium. The back side got a coat of green spray paint.
Next create your design (assuming you are cutting your template from vinyl). I have a commercial machine, but you can certainly do this with your cricut or silhoutte or whatever you have. :)
When weeding, treat this like a negative. Take out the parts you want to show on the final product.
Now that your vinyl is prepped, apply your transfer tape and remove the backing.
Apply the vinyl mask to the wood. Make sure you get it down onto the wood REALLY good. If you don't the paint will bleed under.....trust me on this one.
Next, I drybrushed paint onto the mask. I did it very lightly as I want the final product to look very aged and worn. You can decide how much paint you want on yours.
Here is a closeup detail shot of the tree. I flicked the ends of my white paint brush to create a speckled look on the tree. I wanted to give it a hint of "snow".
Allow the paint to dry to the touch, then remove the vinyl mask. It is already looking so good! I was tempted to clear coat it and call it a day.
Flip the sign over and repeat on the backside. I used orange and red paint on this side to bring in some deeper fall colors. Again, I used a dry brush and minimal paint. I did red on the top and bottom and orange through the center and blended them into each other.
Remember how I said make sure you apply the vinyl well......I was rushed....the paint bled. I wanted to sand it down and start all over, but decided to just press on and see how it turns out.
After both sides were dry, I got my orbital sander and hit the edges. On the green side, I sanded it so some of the natural wood and some of the blue came out. I love it!
Next, I applied my Antiquing Glaze.
I started in the upper left corner and worked my way over.
Here is the Merry Christmas side after glazing.
I love how the glaze gives it a dirty look. The glaze settled into the wood's natural eyes and grooved, just like years of dirt and wear would.
Here you can see how the blue peeks through.....I love that!
And here is my disaster of the day! This side just did not want to cooperate. I wanted aged and rugged, but I think this is a bit on the overboard side.
See how my wiping the glaze away took most of the upper portions on several letters......I am twitching to repaint and start this side over.
The paint bled under the vinyl mask, I over glazed and over wiped.....
The perfectionist in me hates it! The sloppy laid back part of me kind of loves it....I am not sure which one will win out. But for today, it is staying this way.
* if you would like the vinyl for this project (or the file if you have a vinyl cutter) let me know! :)